Thanks to Jane Starr for calling this to our attention. The Smithsonian Craft Show looks like a great way to survey the current craft scene. Maybe some folks would like to do a day trip?
Check it out.
http://www.smithsoniancraftshow.org/indexmain.asp
Monday, March 22, 2010

Saturday, March 20, 2010
Terry Whye's Squirt and Spin Workshops
Terry will be back to conduct her usual, high energy, "contentful" workshops on April 17 and 24th from 9-12 for adults and 2-5 for kids 8+. See the RAL website for details (http://www.rehobothartleague.org/cube/index.php?page=1&act=viewCat&catId=9 at the bottom). Looks like a really good workshop.
Registration online, at the RAL office or on the phone, 302-227-8488.
Registration online, at the RAL office or on the phone, 302-227-8488.
Glaze Update
All of our glazes have been updated as of Fri. 3.19.10. Tests have been done for several of them (vertical tiles on the right side of the test shelf and pictured below) and more tests will follow this week. Some pictures of the current glazes and combinations can be found below. Please also note that 3 of the glazes with running tendencies are now in the orange buckets in the studio. Please use these with caution and proper procedure (see previous post for advice on working with these). Kate has also posted some advice on glazing for firing in the kiln room. Please take a couple of minutes to read these messages.
With all of our glazes, you need to make sure that all the ingredients are thoroughly remixed. This includes scraping the sides for the dried material to be returned to the glaze (use CD's on wall above drill outlet) and making sure you scrape the bottom of the bucket and the corners the drill mixer can't reach (use a stick to retrieve material in that area and to make sure all material has been scraped of the bottom of the bucket).
When double dipping, let your first glaze completely dry before dipping into the second glaze.
Here are some recently glazed pieces:


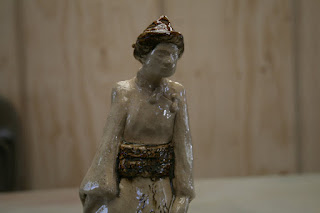
Close up - Terra Cotta Warrior!


With all of our glazes, you need to make sure that all the ingredients are thoroughly remixed. This includes scraping the sides for the dried material to be returned to the glaze (use CD's on wall above drill outlet) and making sure you scrape the bottom of the bucket and the corners the drill mixer can't reach (use a stick to retrieve material in that area and to make sure all material has been scraped of the bottom of the bucket).
When double dipping, let your first glaze completely dry before dipping into the second glaze.
Here are some recently glazed pieces:

Brenda - Nutmeg on the insde, Gloria's outside with New Blue at the top

Brenda - Same combination as above

Faye Kempton Sculpture- isn't it elegant!

Close up - Terra Cotta Warrior!

Jane - Jade with BTBT sponged

Pam - Nutmeg and Milky Blue
All of the following are on Standard 112. New results will be on Standard 153 and 182

Milky Blue

Jade

Gloria's

BTBT (Blue Thick, Brown Thin) I know it's green now...chemical imbalance. Will work on it.
Saturday, February 20, 2010
Kiln Shelf Cleaning Party
Before we had all the snow, Terry Whye came over from Maryland with her crew and proceeded to resurface the kiln shelves, which as you know, were in terrible. She just forwarded some photos of the process. We all need to do all we can to make sure the shelves stay in their new pristine state. Here are the pictures Terry sent:
 Terry and Jeannette applying new kiln wash to the shelving that had been completely scraped down.
 Loren Scherbak of Rockville Maryland brought a selection of power tools for grinding off the old kiln wash and glaze drips. We used diamond bits and several electric grinders. High quality respirators are required so the dust cannot be breathed in.
 Grinding is a noisy, dirty job. We are highly motivated to keep the shelves free of glazing drips in the future! Terry Whye of Finksburg Maryland grinds away at one of dozens of shelves badly needing maintenance.
 Tada! Now we need clean or new posts to holdup each shelf to avoid newblemishes on the shelves.


Terry Whye was joined by three hardworking Maryland volunteers: Loren
Scherbak, Charlene Fischer and Jeannette Dowling who have all assisted in Whye's workshops. They were welcomed by Wes Stack who assisted in applying the new wash. Kate Lear joined in to get some tips on shelf maintenance and to try out her new electric grinder. Karen and Kim also stopped by during the work day to cheer on the troops. Thursday, February 18, 2010
Glazes Upgrade
The following glazes have been topped off. Test tiles are ready for firing, but haven't been fired yet, so use at your peril.
Jade Green
Gloria's
Milky Blue
BTBT
Reminder that the latter two run, so you may want to follow the previous guidelines in their use.
Jade Green
Gloria's
Milky Blue
BTBT
Reminder that the latter two run, so you may want to follow the previous guidelines in their use.
More glaze tips for RAL potters
Glaze tips-
The recent glaze results give rise to several tips, which might be useful.
First, the glaze buckets will accumulate a residue of materials on the sides of the bucket. This residue will contain various components of the glaze, which are critical to its desired application.
So the first tip is to always scrape the sides of the bucket before glazing. Some of our glazes will tend to settle out prior to, and even after, mixing/blending. Stir the glaze well before glazing and even in between applications.
Second - Runny glazes-
We have several glazes, which have a tendency to run, especially when combined with other glazes that also run (Milky Blue, BTBT and New Blue). When using these glazes either alone or in combination, use the following procedures:
1. The Amie/Carmela procedure – dip your piece into a water bucket about 1/4 to 1/3 up from the bottom prior to glazing
2. The Kate procedure –after dipping your piece 2/3 from the top, paint the rest of the piece with the glaze to the to the bottom 1/4” point.
Third, be aware that glazes can vary over time depending on evaporation and the possibility of contamination due to introduction of other materials into the gaze mix. If you get an unusual result from your glazed pieces or notice a variation in the appearance of a given glaze, please make note of it in the glaze notebook and notify Wes Stack (wesnerstack@comcast.net).
Fourth, thickness of the glaze is an important determinant of the outcome. Most of our glazes require a hold of 3 seconds in the glaze to get the desired results. This is only for the first dip. If you are using a double dip, a one second hold is sufficient. A longer hold will probably result in running.
The recent glaze results give rise to several tips, which might be useful.
First, the glaze buckets will accumulate a residue of materials on the sides of the bucket. This residue will contain various components of the glaze, which are critical to its desired application.
So the first tip is to always scrape the sides of the bucket before glazing. Some of our glazes will tend to settle out prior to, and even after, mixing/blending. Stir the glaze well before glazing and even in between applications.
Second - Runny glazes-
We have several glazes, which have a tendency to run, especially when combined with other glazes that also run (Milky Blue, BTBT and New Blue). When using these glazes either alone or in combination, use the following procedures:
1. The Amie/Carmela procedure – dip your piece into a water bucket about 1/4 to 1/3 up from the bottom prior to glazing
2. The Kate procedure –after dipping your piece 2/3 from the top, paint the rest of the piece with the glaze to the to the bottom 1/4” point.
Third, be aware that glazes can vary over time depending on evaporation and the possibility of contamination due to introduction of other materials into the gaze mix. If you get an unusual result from your glazed pieces or notice a variation in the appearance of a given glaze, please make note of it in the glaze notebook and notify Wes Stack (wesnerstack@comcast.net).
Fourth, thickness of the glaze is an important determinant of the outcome. Most of our glazes require a hold of 3 seconds in the glaze to get the desired results. This is only for the first dip. If you are using a double dip, a one second hold is sufficient. A longer hold will probably result in running.
Friday, February 12, 2010
Glaze Tip #1 - Using Oxide Washes
Oxide washes can be used effectively to enhance fired surfaces. However, some care is needed in the application. Once an oxide wash has been applied to bisqued ware, you should not dip the piece into a glaze bucket. The wash is usually powdery and could wash off and contaminate the whole batch. A better way to apply glazes to bisque pieces which have an oxide wash on them is to pour the glaze on the piece over another container. If it is obvious that the glaze has oxides in it, you would discard the smaller amount
Subscribe to:
Posts (Atom)