Monday, September 13, 2010

Two fall classes


The following classes are being offered at the Art League this fall. We are looking for participants to register in order to have the classes make. Both classes cover relevant topics for all studio members. You can register online or at the Art League office. Here are the class descriptions. Give Kim a call if you have questions.

FROM MUD TO MAIOLICA with Terry Whye

ADULTS Beginning to intermediate levels 9 a.m. to noon, 2 Saturdays
YOUTH Beginning to advanced levels 2 PM- 5 PM, 2 Saturdays

September 25 and October 2


If you enjoy decorative painting on your pottery and wish to expand your
technique and materials knowledge, then welcome to the world of maiolica
pottery! Tiles, simple bowls or platters will be slab constructed using a
rich dark brown maiolica clay. Classic opaque white glazes are combined with
the brushwork techniques of in-glaze painting characteristic of this
colorful ceramic art form. Includes a brief history of Maiolica ware, from
its roots in the Middle East, its spread to the Mediterranean and most of
Europe to its modern day translation by studio potters in North America.
Please note that these techniques are easily adapted to cone 6 firing
temperatures and a suitable high fire glaze recipe will be provided, making
this a useful class to anyone who attends open pottery studio days at the
League! Wear comfortable, old clothing.

A Simple Approach to Complex Pots:
Handles, Knobs & Decoration
with Steve Witmer
October 25,  9 a.m.- 1 p.m.
This workshop is designed to explore additions to the basic pottery form. It’s through these additions to the basic vessel that the potter can transform an ordinary piece into an extraordinary one. The purpose of the workshop is to expand the thought process of the participants so that they are in control when they choose to push the limits of traditional pottery. Bring a sketch book, colored drawing medium (colored pencils, crayons, markers), one or two 6-9” cylinders (thrown or handbuilt) that are leather-hard, and any clay tools that you normally use in the studio.

$60 – Members              $95 – Future members

To register online for either go to http://www.rehobothartleague.org/ or call 302-227-8408 to register with credit card.

Thursday, August 12, 2010

Possible Workshop with Steve Witmer

Kim is speaking with Steve Witmer, a Pa. potter and retired art instructor, about the possibility of a workshop in the fall for the RAL. Steve has been showing at the RAL Outdoor Show for the past several years, and those of us who have seen his work can attest to his aesthetics and craftmanship.

We are attempting to find out how many of our members would be interested in taking an "additions" workshop with Steve. The general idea is that we would bring our handbuilt or thrown pieces to the workshop, and Steve would instruct us in adding pieces to provide interest and texture. Steve also has some unique ways of glazing that he could share with us.

There will be a sign up sheet on the desk in the studio. Please add your name if you think you would like to participate or send an email and we'll sign in for you. No dates have been set at this time.

Check out Steve's work this weekend. If you can't attend, the images below will give you an idea of how he builds and enhances his pottery.


New Glaze Tests 7.10


The following are glaze test results recently fired. All of the tests were fired either at cone 6 and fast cooled or at cone 6 and slow cooled. Two different clays were used for each glaze. The round pieces are Standard 153 and the square tests are Standard 182. The tests will be repeated with Standard 112 in the near future. Some of the glazes came from our regular studio glaze set and some from other sources. Each piece was dipped once, then dipped again at the top to see thickness effects. The results are interesting in several ways. First, slow cooling does not produce good results in all glazes, although for some glazes it is necessary. Second, some of the glazes from MC6G (Mastering Cone 6 Glazes) which should need slow cooling, seem to be more attractive at straight cone 6 without slow cooling, which might make them candidates for inclusion in our studio glaze set. Third, the glaze application is important. Many of the glaze tests have too thick an application which may be affecting the better appearance of the glaze if thinly applied. Fourth, the type of clay has an effect in the appearance in some, but not all glazes.

Here are images of the results. In each, the fast cooled pieces are on the left, the slow cooled on the right. On some pieces you can see the additional effect of a brush of breaking glaze.
Click on each image to see larger version.
Randy's Red
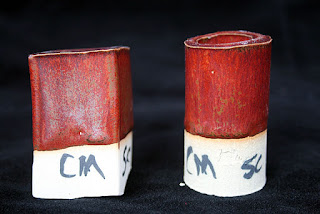
The better appearance seems to be related to clay (153) rather than cooling program. Notice also that the heavier application at the top produced some variation.

Gloria's 
Main effect is thickness. Too thick an application overcomes the "toast" look.
No effect from slow cooling.


MC6G Variegated Blue
Definite effect from slow cooling, however the cone 6 version is very attractive.


A close up of the two versions of Variegated Blue


VC 72 base with New Blue colorants.
Not much effect from slow cooling, but this glaze doesn't have the problems of the old New Blue (running, turning pea green at cone 6). It also shows another variation with thickness of application.
Test batch is available in the studio for your use.


MC6G Clear Powder Blue
Definite effect from slow cooling, but both versions are attractive.


Bill Van Gilder's Crocus Red
Previous firings of this glaze at cone 6 or less without slow cooling produced dark browns. This is one that really requires slow cooling to get the red appearance, but proves you can get red reds at cone 6.


Bailey Yellow
Fast cooled version looks better than slow cooled, but still not yellow enough for studio needs. Not a bad "sand" color though and very well behaved.
Test batch is in the studio for your use.


"Green Ice" - a version of MC6G Spearmint.
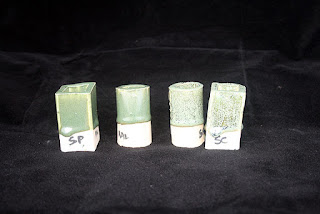
Definite effect from slow cooling which brings out the crystalline growth in the glaze. The fast cooled is not unattractive, but lacks depth. MC6G original Spearmint will be tested soon.

The following two use glazes not presently in the studio, but illustrate the possibilities in combining glazes to get new effects.

Kavanaugh Berry Rust over Cream Rust


MC6G Waterfall Brown over Field Mouse Brown

Monday, April 19, 2010

RAL Clay Studio Notices 4.19.10

From Terry Whye,

Brent Extruder system for sale with both 4 & 9" barrels, sets of birch and
metal dies, plenty of dies for both sizes, a cutting kit, wall bracket and
more. The regular price without shipping is $1524 and I am asking $700 for
all. Feel free to pass this info on to other potters, art teachers and
schools. 443-375-9288 (If I didn't have one I' buy it...a good deal - Wes.)

In an effort to improve the work flow in the kiln room, Kate has posted the following notice:
All pieces over 2 months old should be removed from the studio by May 1. (They are located on the new shelves in the wheel/glazing room.) Items left after that date will be discarded.

If you have pieces that you have left, please pick up as soon as possible.

Cubbies available to Open Studio members.Rent will be $5 per month. Availability will change with new classes as students will receive a cubbie space as part of their registration. Contact Pam Blessinger for rental arrangements. (clayqueeen@yahoo.com)

Wednesday, April 7, 2010

Studio News4.7.10

Open Studio members can now rent a "cubbie" to store their clay, projects and tools. The rent will be $5 per month and can be shared with another person. Rent and assignment will be on a "first come, first served" basis. Cubbie space will be renewable at the end of the month based on availability. See or email Pam Blessinger (clayqueeen@yahoo.com).

Monday, March 22, 2010

Smithsonian Craft Show

Thanks to Jane Starr for calling this to our attention. The Smithsonian Craft Show looks like a great way to survey the current craft scene. Maybe some folks would like to do a day trip?

Check it out.
http://www.smithsoniancraftshow.org/indexmain.asp

Saturday, March 20, 2010

Terry Whye's Squirt and Spin Workshops

Terry will be back to conduct her usual, high energy, "contentful" workshops on April 17 and 24th from 9-12 for adults and 2-5 for kids 8+. See the RAL website for details (http://www.rehobothartleague.org/cube/index.php?page=1&act=viewCat&catId=9 at the bottom). Looks like a really good workshop.
Registration online, at the RAL office or on the phone, 302-227-8488.

Glaze Update

All of our glazes have been updated as of Fri. 3.19.10. Tests have been done for several of them (vertical tiles on the right side of the test shelf and pictured below) and more tests will follow this week. Some pictures of the current glazes and combinations can be found below. Please also note that 3 of the glazes with running tendencies are now in the orange buckets in the studio. Please use these with caution and proper procedure (see previous post for advice on working with these). Kate has also posted some advice on glazing for firing in the kiln room. Please take a couple of minutes to read these messages.

With all of our glazes, you need to make sure that all the ingredients are thoroughly remixed. This includes scraping the sides for the dried material to be returned to the glaze (use CD's on wall above drill outlet) and making sure you scrape the bottom of the bucket and the corners the drill mixer can't reach (use a stick to retrieve material in that area and to make sure all material has been scraped of the bottom of the bucket).

When double dipping, let your first glaze completely dry before dipping into the second glaze.

Here are some recently glazed pieces:


Brenda - Nutmeg on the insde, Gloria's outside with New Blue at the top

Brenda - Same combination as above

Faye Kempton Sculpture- isn't it elegant!


Close up - Terra Cotta Warrior!

Jane - Jade with BTBT sponged


Pam - Nutmeg and Milky Blue

All of the following are on Standard 112. New results will be on Standard 153 and 182

Milky Blue

 Jade


Gloria's 

BTBT (Blue Thick, Brown Thin) I know it's green now...chemical imbalance. Will work on it.


Saturday, February 20, 2010

Kiln Shelf Cleaning Party

Before we had all the snow, Terry Whye came over from Maryland with her crew and proceeded to resurface the kiln shelves, which as you know, were in terrible. She just forwarded some photos of the process. We all need to do all we can to make sure the shelves stay in their new pristine state. Here are the pictures Terry sent:


Terry and Jeannette applying new kiln wash to the shelving that had been completely scraped down.
Loren Scherbak of Rockville Maryland brought a selection of power tools for grinding off the old kiln wash and glaze drips. We used diamond bits and several electric grinders. High quality respirators are required so the dust cannot be breathed in.
 
Grinding is a noisy, dirty job. We are highly motivated to keep the shelves free of glazing drips in the future! Terry Whye of Finksburg Maryland grinds away at one of dozens of shelves badly needing maintenance.
 
Tada! Now we need clean or new posts to holdup each shelf to avoid newblemishes on the shelves.


Terry Whye was joined by three hardworking Maryland volunteers: Loren
Scherbak, Charlene Fischer and Jeannette Dowling who have all assisted in Whye's workshops. They were welcomed by Wes Stack who assisted in applying the new wash. Kate Lear joined in to get some tips on shelf maintenance and to try out her new electric grinder. Karen and Kim also stopped by during the work day to cheer on the troops. 

Thursday, February 18, 2010

Glazes Upgrade

The following glazes have been topped off. Test tiles are ready for firing, but haven't been fired yet, so use at your peril.

Jade Green
Gloria's
Milky Blue
BTBT

Reminder that the latter two run, so you may want to follow the previous guidelines in their use.

More glaze tips for RAL potters

Glaze tips-
The recent glaze results give rise to several tips, which might be useful.

First, the glaze buckets will accumulate a residue of materials on the sides of the bucket. This residue will contain various components of the glaze, which are critical to its desired application.
So the first tip is to always scrape the sides of the bucket before glazing. Some of our glazes will tend to settle out prior to, and even after, mixing/blending. Stir the glaze well before glazing and even in between applications.

Second - Runny glazes-
We have several glazes, which have a tendency to run, especially when combined with other glazes that also run (Milky Blue, BTBT and New Blue). When using these glazes either alone or in combination, use the following procedures:

1. The Amie/Carmela procedure – dip your piece into a water bucket about 1/4 to 1/3 up from the bottom prior to glazing
2. The Kate procedure –after dipping your piece 2/3 from the top, paint the rest of the piece with the glaze to the to the bottom 1/4” point.

Third, be aware that glazes can vary over time depending on evaporation and the possibility of contamination due to introduction of other materials into the gaze mix. If you get an unusual result from your glazed pieces or notice a variation in the appearance of a given glaze, please make note of it in the glaze notebook and notify Wes Stack (wesnerstack@comcast.net).

Fourth, thickness of the glaze is an important determinant of the outcome. Most of our glazes require a hold of 3 seconds in the glaze to get the desired results. This is only for the first dip. If you are using a double dip, a one second hold is sufficient. A longer hold will probably result in running.

Friday, February 12, 2010

Glaze Tip #1 - Using Oxide Washes

Oxide washes can be used effectively to enhance fired surfaces. However, some care is needed in the application. Once an oxide wash has been applied to bisqued ware, you should not dip the piece into a glaze bucket. The wash is usually powdery and could wash off and contaminate the whole batch. A better way to apply glazes to bisque pieces which have an oxide wash on them is to pour the glaze on the piece over another container. If it is obvious that the glaze has oxides in it, you would discard the smaller amount

Follow up on studio glaze results

Barbara wrote to say that the fish had New Blue and Jade on them (and not running). Jo Ann also responded that she had put Gloria's on the "blister bowl" thin. That's a puzzle. Hopefully, we can do some testing and glaze making next week.

Thursday, February 11, 2010

The day after

Hope everyone made it through the latest storm in good shape. Aside from being down a long driveway full of snow, we made out fine...didn't even lost power this time.

Since I had some time, I thought I would share a couple of photos of some glaze combinations I like. The glazes are ones we have in the studio. The pictures are not that great since I couldn't get out to my usual photo set up, but you can see the colors OK.

First dipped in Jade, allowed to dry, then overdipped in BTBT. Notice the BTBT has a tendency to run, but not too much. I wouldn't take the overdip near the bottom, but the bottom third could be painted on if you wanted a uniform bluish color.

 
 The plate was first dipped in Nutmeg half way, then dipped in Byrne. You can see the area in the middle where the two overlapped.

If you have any pictures of pieces with good results, please send them along ,and we'll post them for everyone to view.

Tuesday, February 9, 2010

Studio expansion underway!

If you have been in the studio lately you will have noticed that construction of the throwing area is progressing. The student cubbies (storage units), wall storage units and workbenches for the wheels are completed,  Next the cubbies will be bolted together and attached to the wall and power provided to the wheels. We also have a clay mixer provided by Bill van Gilder to be wired in the future. Here are some pictures of the guys at work .Peter and Bruce are also working on the project, but weren't there for the photo op.

Gary, Wes and Jeff working for posterity (or is it posteriority?)


Gary and Jeff doing cubbie work

 
Now the wall units


Work benches for the wheels


Cubbie units ready for attachment

Monday, February 8, 2010

Glazing results

A recent glaze firing resulted in some interesting and disappointing outcomes. This post will focus on the disappointing since you need to know about some of the glazes before doing your next glazing. If you are aware of whose pieces these are, please let me know so we can document the glazes and processes they used.
This cup may have had Gloria's overdipped with BTBT or Milky Blue. The bottom glaze ran and stuck.
 
These 3 photos are of the same bowl. Again it looks like Gloria's was used. Besides running it also blistered in the bottom. It could be both pieces with Gloria's used a thick application. Or, it could be that this batch of Gloria's is defective.

 
Another example of Gloria's running. Again thickness may be the problem.

 
Would like to know the combinations on  these. None ran and the top left and bottom right are interesting. The latter is particularly so because it looks like Nutmeg and Gloria's with no running. 
  
Milky Blue on tail, Jade on head?

 
New Blue on tail, Jade on head?

Sunday, January 3, 2010

New Year - New Possibilities

Happy New Year!

RAL Open Studio has new hours and days.
Open Studio hours will now be on Tues. and Thurs. from 10:00 a.m. to 4:00 p.m.

A studio monitor will be available to assist members.

Click on this link to access the RAL Studio calendar.

Open Studio fees are $2.00 per hour (or any portion thereof) with a maximum of $10.00 per day. Fees for studio use, clays and tools will be given to the monitor when leaving the studio.

Clays can be purchased for $25.00 per bag, which includes two firings and glazing. It's a bargain considering the costs of glazing and firing using your own clay

Join us in the studio!